
WIP 3 – 3D printed Armature on OOAK Doll
I close my eyes and peak through my fingers as I look at the date on my last post….August 12!! EEEK!
I think this is something we all face..time and the lack there off it. But it is sad to think that I didn’t create a thing in 5 months. I will certainly try harder this year, but only time will tell………
Any way enough ranting! I have actually finished the sculpting on my Fire doll. So here are the next steps which will mostly be about how to smooth out the dolls. The last WIP 2 left us with a doll that had her form all roughed in ready to refine, smooth and detail. So lets get to it! If you haven’t yet read the past posts you can check them out here WIP 1 and WIP 2
At this point she is looking good in terms of where her lines are. Remember to keep turning and re”drawing” her. If something doesn’t look right from that angle then add or remove clay as needed – turn and repeat until all angels are correct.


When adding clay you need to ensure it’s pressed on firmly with no air pockets between the old and new layers (this can cause issues when cooking) and you should scratch in the seams (as in the picture below) this is a raking effect and creates an average medium that can be smoothed out (see more on this below).

Once you have the form locked in you can start with the smoothing. Below you can see all the tools I like to use for smoothing. There is my main sculpting wooden tool, my raking tools, paint brushes for smoothing, a chip paintbrush, Isopropyl Alcohol and a cup to hold it. (the nip nozzle on the isopropyl is not for pouring shots! But just makes it easier for me to pour some when I need it without having to deal with safety caps – not a good idea if children have access to it! I got my nip pourer from the $2 shop

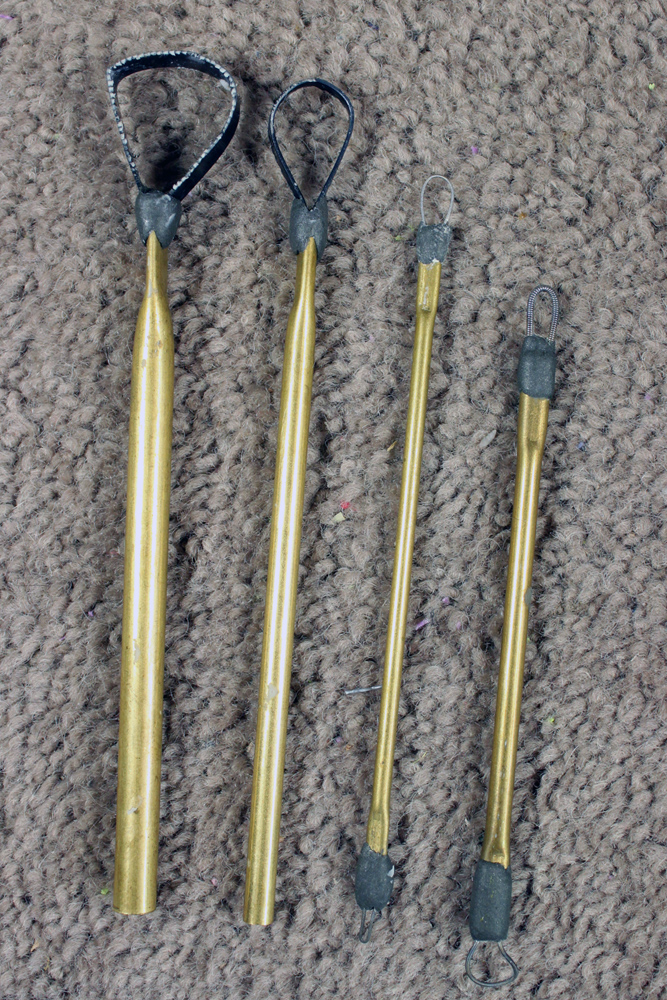
A closer look at the raking tools. I made these following the Stan Winston School of Character Arts tutorial, and the have a lot of wonderful videos, so you can check them out here Stan Winston School of Character Arts
Smoothing takes several steps of rake and smooth, rake and smooth…until you get it perfect. Below you can see the first raking sweep. I have a few raking tools and I start with the biggest teeth first and work down to the finer teeth (just like sanding paper). The whole idea is you are raking the clay surface creating a medium average so that when it gets smoothed out it is minus the bumps. Its no different to raking out soil to create a flat surface for grass.

Below is a close up shot of the raking, you want to go in a crisscross fashion so you don’t create any runts in the clay.

And now for the miracle….Isopropyl Alcohol. If you use Polymer clay and don’t use this then go out and get some now!!! It is without a doubt my most important tool when sculpting – even above my wooden tool! Use a clean new (not one you have painted with before) brush to smooth out the raked clay, the isopropyl alcohol will soften and smooth the clay and fill the gaps.

Here is the leg after just one rake and smooth. Big difference huh?!

Then it’s rake and smooth again using a finer rake. It depends on what part I am smoothing, but I usually do 2-3 rake and smooths. I also like to finish with using my chip brush instead of the rake. This can give the clay a nice texture in the skin, and doesn’t leave as much clay snot (that’s what the little blobs of clay caused by the raking are called 🙂 )

And here she is after a few rakes and smooths. One other thing to note – Does this doll look pretty clean to you? I left this doll sitting in the open air in my office (which is directly attached to my garage) for the over 5 months I tool to make this doll. And dirt is 100% not an issue because all the isopropyl smoothing also keeps the clay free from dust and dirt.


Here is the rest getting raked, I did the leg separate above for demonstration purposes, but I usually work on the doll as a whole

And here is some detail work done on her. Sorry if this looks like it has jumped a bit, but this tutorial is focusing on the creation over a 3D armature and a demonstration of how I smooth my pieces. I am not going into detail on how the detailing was done, but I will post pictures of her until she is completed.

And the sculpture now is complete except for closing off her back once she is off the bracket, and her tail, and her base. I will post again when that and her painting is all done.
I hope you have enjoyed this tutorial and there is stuff in here that will help. If you have any questions please feel free to ask.
Thanks for watching!
Julie Sharpe


